Usage
The following figure shows the infrastructure of the software used:

To launch the docker containers (via docker compose), first change to the folder of the cloned git repository. Note, the folder name may be different if you have downloaded a release:
cd data-engineering-infrastructure.git
NOTE: Don't start the Deployment as root.
The docker containers can then be started with the following command:
./Deploy-DeDs-Rocket.sh
NOTE: To run in background use:
nohup ./Deploy-DeDs-Rocket.sh
To run a Deployment with reduced ressource needs use:
./Deploy-DeDs-Firework.sh
If only the Pyspark client node is necessary you can start it with the command:
./Deploy-DeDs-Candle.sh
If the containers were started in the foreground, they can be stopped by strg-c. Otherwise the containers can be stopped with the following command:
docker compose stop
Workspace
The working directory of the Client Node (PySpark and Jupyter Notebook) is: data-engineering-infrastructure.git/workspace/ (path can be different if you have downloaded a release)
NOTE: Place all your files (jupyter notebooks, etc.) under the workspace/ folder!
Docker Volumes and the Different File System Paths
The workspace/ folder inside the data-engineering-infrastructure.git repository is a so-called Docker volume. First of all, you need to be aware that Docker containers contain their own file system as well as the Linux distribution's directory structure (similar to a virtual machine). A volume is a folder that is shared between the host and one or more docker container. This means that the contents of the folder on the host are also available inside the container and vice versa.
Since the notebooks are executed within the client-node container, all file system paths used in the code cells must be related to the file system within the container. For example, if a file named data.csv is located in the workspace folder on the host, the path to use the file in a notebook is "/home/pyspark-client/workspace/data.csv ". The following graphic illustrates the shared folder between the host and Docker container.

Shared folder (Docker volumes) between the host and multiple Docker containers.
Docker in Docker (dind)

Since we want to start and stop other containers on the host via the notebooks, which are, after all, running inside a Docker container, Docker was also installed in the client-node Docker container so that we can use the host's Docker daemon via a Docker volume. The following graphic illustrates this.

Docker in Docker via a Docker volume.
Web UI URLs
Below is a list of URLs for accessing the Jupyter Notebook and Hadoop (via a web browser of your choice):
- Client-Node:
- Jupyter Notebook: 127.0.0.1:8888
- Spark web UI (only available during running spark jobs!): 127.0.0.1:4050
- Hadoop Edge-Node
- ResourceManager: 127.0.0.1:8088
- NameNode: 127.0.0.1:9870
- Hadoop Worker-Node 1
- NodeManager: 127.0.0.1:8041
- DataNode: 127.0.0.1:9901
- Hadoop Worker-Node 2
- NodeManager: 127.0.0.1:8042
- DataNode: 127.0.0.1:9902
Ports
The following is an overview of the ports used (mapping from docker container to host):
| Host OS | Container | Description |
|---|---|---|
| 8888 | 8888 | Jupyter Notebook web application |
| 4050 | 4050 | Spark web UI (only available during running spark jobs!) |
| 9000 | 9000 | NameNode metadata service (Edge-Node) |
| 9870 | 9870 | NameNode web UI (Edge-Node) |
| 8088 | 8088 | ResourceManager web UI (Edge-Node) |
| 8041 | 8042 | NodeManager web UI (Worker-Node 1) |
| 9901 | 9864 | DataNode web UI (Worker-Node 1) |
| 8042 | 8042 | NodeManager web UI (Worker-Node 2) |
| 9902 | 9864 | DataNode web UI (Worker-Node 2) |
Installation of Further Libraries
All libraries required for completing the tasks are already available in the Docker image provided. However, if additional or individual libraries are required, they can be installed within the container as follows.
Installing using the Termin from the Jupyter WEB UI (127.0.0.1:8888)
Open the Terminal:
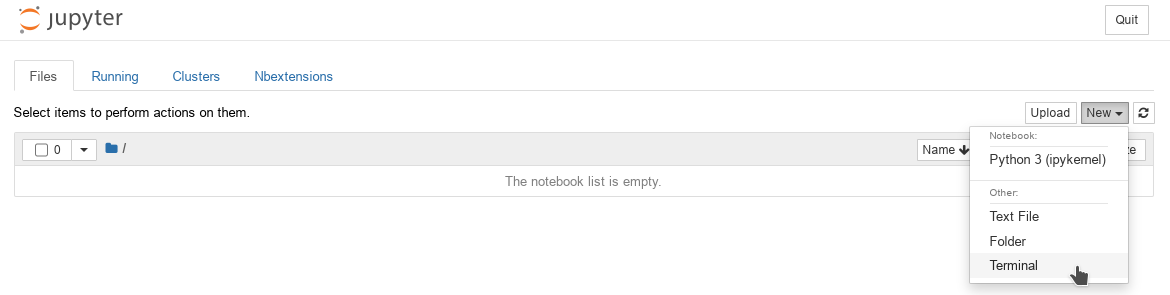
Start page of the Jupyter Notebook WEB UI (open new terminal)

Jupyter Notebook WEB UI Terminal
To install additional Python modules as a user with pip:
python -m pip install <MUDULE> --user
Additional software can also be installed system-wide via Ubuntu's Advanced Packaging Tool (APT):
sudo apt install <SOFTWARE>
NOTE: The user password is the same as the username :)
Installing using the Docker Container Terminal
There are several possibilities here. On the one hand, the command can be "passed" to the container:
Python modules
docker exec -t dbis-pyspark-client-node \
bash -c "python -m pip install <MUDULE> --user"
System-wide Software via APT:
docker exec -t dbis-pyspark-client-node \
bash -c  "echo 'PASSWORD' | sudo -S apt install <SOFTWARE>"
Alternatively, you can open a terminal inside the container and execute the commands:
docker exec -it dbis-pyspark-client-node bash
Installing using a Notebook Code Cell
The software can also be installed via a Jupyter Notebook cell (bash cell magic):

Jupyter Notebook bash cell, pip command

Jupyter Notebook bash cell, apt install command